ASP.NET3.5中包含了新的数据绑定控件--ListView,这是一个类似与 repeater 与 gridview 结合的控件,可以实现添加,删除功能,同时还可以像 repeater 一样灵活的控制页面的布局。该控件包含了很多新的模板,比如 GroupTemplate 等新增的模板,可以方便的分组显示数据。详细的大家可以去查 MSDN 文档。
我一直认为学习数据绑定控件从最简单的增删改查开始,可以对该控件有较深刻的理解,这样可以举一反三,在进行综合运用。今天这篇文章还是从最基本的数据操作开始,对 ListView 有个感性的认识。
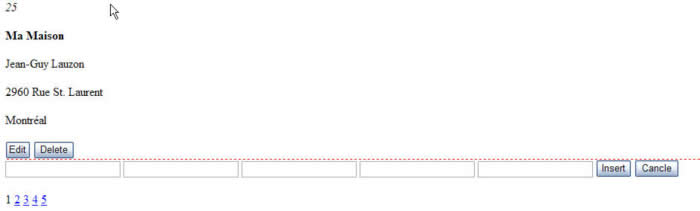
首先看一下程序运行的效果:
页面源码:
<asp:ListView ID="ListView1" runat="server" OnSelectedIndexChanging="ListView1_SelectedIndexChanging"
 OnItemCommand="ListView1_ItemCommand"
OnItemEditing="ListView1_ItemEditing" OnItemCanceling="ListView1_ItemCanceling"
OnItemDataBound="ListView1_ItemDataBound" OnPagePropertiesChanging="ListView1_PagePropertiesChanging"
OnItemInserting="ListView1_ItemInserting" OnItemUpdating="ListView1_ItemUpdating"
OnSorting="ListView1_Sorting" EnableViewState="true"
InsertItemPosition="LastItem" onitemdeleting="ListView1_ItemDeleting">
<LayoutTemplate>
<asp:PlaceHolder ID="itemPlaceholder" runat="server"></asp:PlaceHolder>
<p>
<asp:DataPager ID="MyPage" runat="server" PageSize="6">
<Fields>
<asp:NumericPagerField ButtonCount="10" PreviousPageText="<-- " NextPageText="-->" />

 <%...-- <asp:NextPreviousPagerField ButtonType="Button" ShowFirstPageButton="true" ShowLastPageButton="true"
 ShowNextPageButton="true" ShowPreviousPageButton="true" />--%>
</Fields>
</asp:DataPager>
</p>
</LayoutTemplate>
<ItemTemplate>
<i>
<%...#Eval("SupplierID")%></i>
<p>
<b>
<%...#Eval("CompanyName")%></b></p>
<p>
<%...#Eval("ContactName")%></p>
<p>
<%...#Eval("Address")%></p>
<p>
<%...#Eval("City")%></p>
<asp:Button ID="btnEdit" runat="server" Text="Edit" CommandName="Edit" />
<asp:Button ID="btnDelete" runat="server" Text="Delete" CommandName="Delete" />
<%...-- <asp:LinkButton ID="lbtnSort" runat="server" Text="Sort" CommandName="Sort" CommandArgument="CompanyName" ></asp:LinkButton>--%>
</ItemTemplate>
<EditItemTemplate>
<asp:TextBox ID="txtMy" runat="server" Text='<%#bind("SupplierID") %>'></asp:TextBox>
<asp:TextBox ID="TextBox1" runat="server" Text='<%#bind("CompanyName") %>'></asp:TextBox>
<asp:TextBox ID="TextBox2" runat="server" Text='<%#bind("ContactName") %>'></asp:TextBox>
<asp:TextBox ID="TextBox3" runat="server" Text='<%#bind("Address") %>'></asp:TextBox>
<asp:TextBox ID="TextBox4" runat="server" Text='<%#bind("City") %>'></asp:TextBox>
<asp:Button ID="btnUpdate" runat="server" Text="Update" CommandName="Update" />
<asp:Button ID="btnCancle" runat="server" Text="Cancle" CommandName="Cancel" />
</EditItemTemplate>
<InsertItemTemplate>
<asp:TextBox ID="txtMy" runat="server" Text='<%#bind("SupplierID") %>'></asp:TextBox>
<asp:TextBox ID="TextBox1" runat="server" Text='<%#bind("CompanyName") %>'></asp:TextBox>
<asp:TextBox ID="TextBox2" runat="server" Text='<%#bind("ContactName") %>'></asp:TextBox>
<asp:TextBox ID="TextBox3" runat="server" Text='<%#bind("Address") %>'></asp:TextBox>
<asp:TextBox ID="TextBox4" runat="server" Text='<%#bind("City") %>'></asp:TextBox>
<asp:Button ID="btnUpdate" runat="server" Text="Insert" CommandName="Insert" />
<asp:Button ID="btnCancle" runat="server" Text="Cancle" CommandName="Cancel" />
</InsertItemTemplate>
<ItemSeparatorTemplate>
<div style="height: 0px; border-top: dashed 1px #ff0000">
</div>
</ItemSeparatorTemplate>
</asp:ListView>
这部分代码中有个重要的部分就是通过<LayoutTemplate>模板来设置控件的样式,布局,这也是新增的模板。在 VS.NET2008的正式版本中,要正常运行页面必须在该模板中加入一个名为 itemPlaceholder 的 PlaceHolder 控件。要不会出现如下异常:
An item placeholder must be specified on ListView 'ListView1'. Specify an item placeholder by setting a control's ID property to "itemPlaceholder".
<ItemTemplate>模板用来绑定显示到页面上的数据, <EditItemTemplate>用来显示处于编辑状态的时候显示的数据,其他的可以以此类推。
与 ListView 还搭配的一起使用了新增的 DataPager 控件,这个主要是用于 ListView 控件的分页,是新增的分页空也,可以方便,高效的进行分页。
后台代码:
string ConStr = ConfigurationManager.ConnectionStrings["NorthwindConnectionString"].ConnectionString;
protected void Page_Load(object sender, EventArgs e)
...{
 if (!IsPostBack)

 ...{
...{
ViewState["SupplierID"] = "SupplierID";
ViewState["Direction"] = "DESC";
BindListView();
 }
}
}
private void BindListView()
...{
string QueryCon = "SELECT SupplierID,CompanyName,ContactName,Address,City FROM Suppliers";
SqlConnection NorthWindCon = new SqlConnection(ConStr);
SqlDataAdapter NorthWindDa = new SqlDataAdapter(QueryCon, ConStr);
DataSet Ds = new DataSet();
NorthWindDa.Fill(Ds, "Suppliers");
ListView1.DataKeyNames = new string[] ...{ "SupplierID" };
DataView Dv = Ds.Tables["Suppliers"].DefaultView;
//排序表达式
string SortExpress = (string)ViewState["SupplierID"] + " " + (string)ViewState["Direction"];
Dv.Sort = SortExpress;
//绑定数据源
//ListView1.DataSource = Ds.Tables["Suppliers"];
ListView1.DataSource = Dv;
ListView1.DataBind();
}
protected void ListView1_ItemEditing(object sender, ListViewEditEventArgs e)
...{
ListView1.EditIndex = e.NewEditIndex;
BindListView();
}
protected void ListView1_ItemDataBound(object sender, ListViewItemEventArgs e)
...{
if (e.Item.ItemType == ListViewItemType.DataItem)
...{
((Button)e.Item.FindControl("btnDelete")).Attributes["onclick"] = "if(!confirm('你真的要删除这条记录么?'))return false;";
}
}
protected void ListView1_ItemCanceling(object sender, ListViewCancelEventArgs e)
...{
//取消编辑
if (e.CancelMode == ListViewCancelMode.CancelingEdit)
...{
//e.Cancel = true;
ListView1.EditIndex = -1;
BindListView();
ShowMessage("取消编辑");
}
else if (e.CancelMode == ListViewCancelMode.CancelingInsert)
...{
//BindListView();
return;
}
}
protected void ListView1_ItemInserting(object sender, ListViewInsertEventArgs e)
...{
((TextBox)ListView1.InsertItem.FindControl("txtMy")).ReadOnly = true;
string CompanyName = Server.HtmlEncode(((TextBox)ListView1.InsertItem.FindControl("TextBox1")).Text.ToString());
string ContactName = Server.HtmlEncode(((TextBox)ListView1.InsertItem.FindControl("TextBox2")).Text.ToString());
string Address = Server.HtmlEncode(((TextBox)ListView1.InsertItem.FindControl("TextBox3")).Text.ToString());
string City = Server.HtmlEncode(((TextBox)ListView1.InsertItem.FindControl("TextBox4")).Text.ToString());
string InsertQuery = "INSERT INTO Suppliers (CompanyName,ContactName,Address,City) VALUES ('" + CompanyName + "','" + ContactName + "','" + Address + "','" + City + "')";
SqlConnection InsertCon = new SqlConnection(ConStr);
SqlCommand InsertCmd = new SqlCommand(InsertQuery, InsertCon);
try
...{
InsertCon.Open();
InsertCmd.ExecuteNonQuery();
BindListView();
//将插入行显示到最后
ListView1.InsertItemPosition = InsertItemPosition.LastItem;
}
catch
...{
ShowMessage("插入新数据出错,请重新输入");
}
finally
...{
InsertCon.Dispose();
InsertCmd.Dispose();
}
}
protected void ListView1_ItemUpdating(object sender, ListViewUpdateEventArgs e)
...{
string KeyId = ListView1.DataKeys[e.ItemIndex].Value.ToString();
//找到listview改行的数据集合
string CompanyName = Server.HtmlEncode(((TextBox)ListView1.Items[e.ItemIndex].FindControl("TextBox1")).Text.ToString());
string ContactName = Server.HtmlEncode(((TextBox)ListView1.Items[e.ItemIndex].FindControl("TextBox2")).Text.ToString());
string Address = Server.HtmlEncode(((TextBox)ListView1.Items[e.ItemIndex].FindControl("TextBox3")).Text.ToString());
string City = Server.HtmlEncode(((TextBox)ListView1.Items[e.ItemIndex].FindControl("TextBox4")).Text.ToString());
string UpdateStr = "UPDATE Suppliers SET CompanyName='" + CompanyName + "',ContactName='" + ContactName + "'," +
"Address='" + Address + "',City='" + City + " 'WHERE SupplierID='" + KeyId + "' ";
SqlConnection UpdateCon = new SqlConnection(ConStr);
SqlCommand UpdateCmd = new SqlCommand(UpdateStr, UpdateCon);
try
...{
UpdateCon.Open();
UpdateCmd.ExecuteNonQuery();
ListView1.EditIndex = -1;
BindListView();
}
catch
...{
ShowMessage("更新出错,请重新编辑");
}
finally
...{
UpdateCon.Dispose();
UpdateCmd.Dispose();
}
}
protected void ListView1_Sorting(object sender, ListViewSortEventArgs e)
...{
if (ViewState["SupplierID"].ToString() == e.SortExpression)
...{
if (ViewState["Direction"].ToString() == "DESC")
...{
ViewState["Direction"] = "ASC";
}
else
...{
ViewState["Direction"] = "DESC";
}
}
else
...{
ViewState["SupplierID"] = e.SortExpression;
}
BindListView();
}
private void ShowMessage(string Message)
...{
Literal TxtMsg = new Literal();
TxtMsg.Text = "<script>alert('" + Message + "')</script>";
Page.Controls.Add(TxtMsg);
}
protected void ListView1_ItemDeleting(object sender, ListViewDeleteEventArgs e)
...{
string KeyID = ListView1.DataKeys[e.ItemIndex].Value.ToString();
string DeleteStr = "DELETE FROM Suppliers WHERE SupplierID='" + KeyID + "'";
SqlConnection DeleteCon = new SqlConnection(ConStr);
SqlCommand DeleteCmd = new SqlCommand(DeleteStr, DeleteCon);
try
...{
DeleteCon.Open();
DeleteCmd.ExecuteNonQuery();
BindListView();
ShowMessage("删除成功");
}
catch
...{
ShowMessage("删除出错,请检查数据是否有关联");
}
finally
...{
DeleteCon.Dispose();
DeleteCmd.Dispose();
}
}
以前的 edit_cancel 事件在 ListView 控件中为 item_cancel,在该事件中可以判断是取消编辑还是取消插入新的数据。大家可以看代码。本篇文章主要是对ListView控件一些基本的事件的运用。下一篇会继续深入的学习该控件。
标签:
本站文章除注明转载外,均为本站原创或翻译。欢迎任何形式的转载,但请务必注明出处、不得修改原文相关链接,如果存在内容上的异议请邮件反馈至chenjj@evget.com
文章转载自:CSDN


 首页
首页 


 63次
63次
 相关文章
相关文章 

 微信
微信 在线咨询
在线咨询


 渝公网安备
50010702500608号
渝公网安备
50010702500608号

 客服热线
客服热线