Visual Studio是一款完备的工具和服务,可帮助您为Microsoft平台和其他平台创建各种各样的应用程序。在本系列教程中将介绍如何为图像编辑创建基本的用户界面,有任何建议或提示请在下方评论区留言,我们会及时处理。
第 2 部分:使用 XAML 编辑器添加 GridView 控件
在第 1 部分中介绍了使用 XAML 设计器和 Visual Studio 提供的其他工具,本文将继续介绍使用 XAML 编辑器直接处理 XAML 标记。
首先将根布局 Grid 替换为 RelativePanel。 利用 RelativePanel,可更加轻松地相对于面板或其他部分 UI 重新排列 UI 块,然后添加 GridView 控件以显示你的数据。
- 在 XAML 编辑器中,将根 Grid 更改为 RelativePanel。之前
<Grid Background="{ThemeResource ApplicationPageBackgroundThemeBrush}">
      <TextBlock x:Name="TitleTextBlock"
                 Text="Collection"
                 Margin="24,0,0,24"
                 Style="{StaticResource TitleTextBlockStyle}"/>
</Grid>
之后
<RelativePanel Background="{ThemeResource ApplicationPageBackgroundThemeBrush}">
    <TextBlock x:Name="TitleTextBlock"
               Text="Collection"
               Margin="24,0,0,24"
               Style="{StaticResource TitleTextBlockStyle}"/>
</RelativePanel>
- 在 TextBlock 元素下面,添加名为ImageGridView的 GridView 控件。 设置 RelativePanel 附加属性以将此控件放在标题文本下面,并使其横跨整个屏幕宽度。添加以下 XAML
<RelativePanel Background="{ThemeResource ApplicationPageBackgroundThemeBrush}">
    <TextBlock x:Name="TitleTextBlock"
               Text="Collection"
               Margin="24,0,0,24"
               Style="{StaticResource TitleTextBlockStyle}"/>
</RelativePanel>
添加到以下 TextBlock 之后
<RelativePanel Background="{ThemeResource ApplicationPageBackgroundThemeBrush}">
    <TextBlock x:Name="TitleTextBlock"
               Text="Collection"
               Margin="24,0,0,24"
               Style="{StaticResource TitleTextBlockStyle}"/>

    <!-- Add the GridView here. -->

</RelativePanel>
- 为了让 GridView 显示内容,需要为其提供要显示的数据集。 打开 MainPage.xaml.cs 并查找 GetItemsAsync 方法。 此方法会填充一个称为 Images(这是我们已添加到 MainPage 的属性)的集合。在 GetItemsAsync 中的 foreach 循环后面,添加以下代码行。
ImageGridView.ItemsSource = Images;
这会将 GridView 的 ItemsSource 属性设置为应用的 Images 集合,并为 GridView 提供要显示的内容。
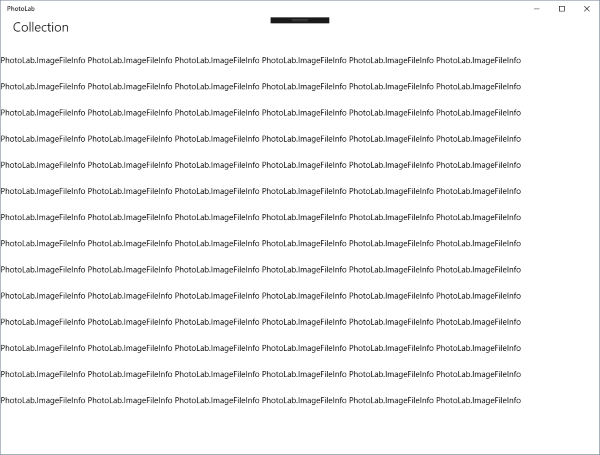
这是运行应用并确保一切正常工作的好地方。 它应该如下所示。
第 3 部分:添加 DataTemplate 以显示你的数据
这部分将创建 DataTemplate,以告诉 GridView 如何显示你的数据,目前将仅添加占位符以帮助创建所需的布局。 在 XAML 数据绑定教程中,你将用 ImageFileInfo 类中的实际数据替换这些占位符。
将数据模板添加到网格视图
- 打开 MainPage.xaml。
- 若要显示分级,你可以使用 Telerik 的 UI for UWP NuGet 程序包中的 RadRating 控件。 添加 XAML 命名空间引用以指定 Telerik 控件的命名空间。 将此项放在左 Page 标记中,紧靠在其他xmlns条目后面。添加以下 XAML
xmlns:telerikInput="using:Telerik.UI.Xaml.Controls.Input"
添加到以下最后一个xmlns条目后面
<Page x:Name="page"
  x:Class="PhotoLab.MainPage"
  xmlns="http://schemas.microsoft.com/winfx/2006/xaml/presentation"
  xmlns:x="http://schemas.microsoft.com/winfx/2006/xaml"
  xmlns:local="using:PhotoLab"
  xmlns:d="http://schemas.microsoft.com/expression/blend/2008"
  xmlns:mc="http://schemas.openxmlformats.org/markup-compatibility/2006"
  xmlns:telerikInput="using:Telerik.UI.Xaml.Controls.Input"
  mc:Ignorable="d"
  NavigationCacheMode="Enabled">
- 在Document Outline中,右键单击 ImageGridView,在上下文菜单中,选择Edit Additional Templates > Edit Generated Items (ItemTemplate) > Create Empty...。创建资源对话框将会打开。
- 在此对话框中,将Name值更改为 ImageGridView_DefaultItemTemplate,然后单击确定。在单击确定时,会出现以下几种情况:
- DataTemplate 将添加到 MainPage.xaml 的 Page.Resources 部分。
<Page.Resources>
    <DataTemplate x:Key="ImageGridView_DefaultItemTemplate">
        <Grid/>
    </DataTemplate>
</Page.Resources>
- Document Outline范围会被设置为 DataTemplate。创建完数据模板后,你可以单击Document Outline左上角中的向上箭头以返回到页面范围。
- GridView 的 ItemTemplate 属性被设置为 DataTemplate 资源。
<GridView x:Name="ImageGridView"
            Margin="0,0,0,8"
            RelativePanel.AlignLeftWithPanel="True"
            RelativePanel.AlignRightWithPanel="True"
            RelativePanel.Below="TitleTextBlock"
            ItemTemplate="{StaticResource ImageGridView_DefaultItemTemplate}"/>
- 在 ImageGridView_DefaultItemTemplate 资源中,为根 Grid 提供一个值为 300 的高度和宽度以及一个值为 8 的边距。然后添加两行,并将第二行的高度设置为 Auto。之前
<Grid/>
之后
<Grid Height="300"
      Width="300"
      Margin="8">
    <Grid.RowDefinitions>
        <RowDefinition />
        <RowDefinition Height="Auto" />
    </Grid.RowDefinitions>
</Grid>
- 将控件添加到网格。
- 在第一个网格行中添加 Image 控件。 此处将显示图像,但是目前将使用应用的应用商店徽标作为占位符。
- 添加 TextBlock 控件以显示图像的名称、文件类型和尺寸。 为此,你可以使用 StackPanel 控件排列文本块。
- 将 RadRating 控件添加到外部(垂直)StackPanel。 将其放在内部(水平)StackPanel 的后面。
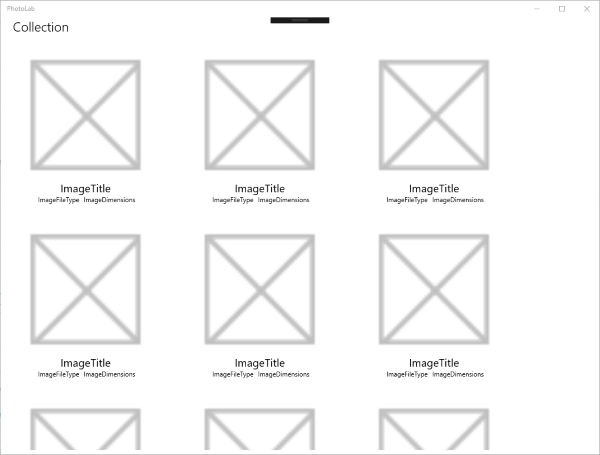
最终模板
<Grid Height="300"
      Width="300"
      Margin="8">
    <Grid.RowDefinitions>
        <RowDefinition />
        <RowDefinition Height="Auto" />
    </Grid.RowDefinitions>

    <Image x:Name="ItemImage"
           Source="Assets/StoreLogo.png"
           Stretch="Uniform" />

    <StackPanel Orientation="Vertical"
                Grid.Row="1">
        <TextBlock Text="ImageTitle"
                   HorizontalAlignment="Center"
                   Style="{StaticResource SubtitleTextBlockStyle}" />
        <StackPanel Orientation="Horizontal"
                    HorizontalAlignment="Center">
            <TextBlock Text="ImageFileType"
                       HorizontalAlignment="Center"
                       Style="{StaticResource CaptionTextBlockStyle}" />
            <TextBlock Text="ImageDimensions"
                       HorizontalAlignment="Center"
                       Style="{StaticResource CaptionTextBlockStyle}"
                       Margin="8,0,0,0" />
        </StackPanel>

        <telerikInput:RadRating Value="3"
                                IsReadOnly="True">
            <telerikInput:RadRating.FilledIconContentTemplate>
                <DataTemplate>
                    <SymbolIcon Symbol="SolidStar"
                                Foreground="White" />
                </DataTemplate>
            </telerikInput:RadRating.FilledIconContentTemplate>
            <telerikInput:RadRating.EmptyIconContentTemplate>
                <DataTemplate>
                    <SymbolIcon Symbol="OutlineStar"
                                Foreground="White" />
                </DataTemplate>
            </telerikInput:RadRating.EmptyIconContentTemplate>
        </telerikInput:RadRating>

    </StackPanel>
</Grid>
现在,运行应用以查看 GridView 以及你刚刚创建的项模板。 但是可能不会看到分级控件,因为它的白星在白色背景中。
更多Visual Studio精彩教程敬请关注~
想要购买Visual Studio正版授权,或者获取更多该产品相关信息的朋友可以点击" 咨询在线客服 "~
标签:
IDE集成开发环境 UML工具代码管控工具
本站文章除注明转载外,均为本站原创或翻译。欢迎任何形式的转载,但请务必注明出处、不得修改原文相关链接,如果存在内容上的异议请邮件反馈至chenjj@evget.com


 首页
首页 


 23次
23次

 相关产品
相关产品 最新文章
最新文章 
 相关文章
相关文章 


 微信
微信 在线咨询
在线咨询


 渝公网安备
50010702500608号
渝公网安备
50010702500608号

 客服热线
客服热线